The Kali Linux NetHunter project is the first Open Source Android penetration testing platform for Nexus devices, created as a joint effort between the Kali community member “BinkyBear” and Offensive Security.
NetHunter supports Wireless 802.11 frame injection, one-click MANA Evil Access Point setups, HID keyboard (Teensy like attacks), as well asBadUSB MITM attacks.
Pre-Requisites:
1) A Nexus device
2) Device should be rooted
3) Should have TWRP custom Recovery Installed/Flashed.
4) (Bootloader, should be unlocked, if locked)
5) A Back Up if anything goes wrong!
Get a Nexus 5 with 200 dollar discount!

Root your Nexus Device and peform step 2,3 and 4
Nexus Root Toolkit v2.1.1
VERSION 2.1.1 – This program will automatically bring together all the files you need to unlock and root your device in a few clicks, or flash it back to stock and re-lock it.
You can also use this program to backup/restore all your important data, flash zips, set file permissions, push and pull files, install apps, generate logcats/bugreports, and much more!
With the included file association options, you can perform tasks like flashing zips, installing apps, restoring android backup files, and flashing/booting img files with just a double click!
The program includes a full featured interface for automating tasks in TWRP, enhanced restore features, an in-built auto-updater/notification system, ‘any build’ mode, advanced restore features,’NRT- Live Log’ for viewing the adb/fastboot cmds that are run in the background, quick tools utilities, and tools for taking screenshots/screen-recordings.
All the latest official Android builds and Nexus devices are supported.
The program intelligently and selectively downloads the files it needs for your device and makes sure you are using the latest files available.
The program can even auto-detect your device and build.
This release brings full Marshmallow root support plus all automated features by utilizing a new system that no longer requires modified boot.imgs.
· Galaxy Nexus: CDMA/LTE Verizon Models
· Galaxy Nexus: CDMA/LTE Sprint Models
· Nexus S: Worldwide, i9020t and i9023 Models
· Nexus S: 850MHz, i9020a Models
· Nexus S: Korea, m200 Models
· Nexus S 4G: d720 Models
· Nexus 7: Asus Tablet
· Nexus 7 3G: Asus Tablet
· Nexus 7 v2 (2013): Asus Tablet
· Nexus 7 v2 (2013) LTE: Asus Tablet
· Nexus 10: Samsung Tablet
· Nexus 4: LG Phone
· Nexus 5: LG Phone
· Nexus 5X: LG Phone
· Nexus 9: HTC Wifi Tablet
· Nexus 9: HTC LTE Tablet
· Nexus 6: Motorola Phone
· Nexus 6P: Huawei Phone
· Nexus Player: Google Device
Screenshot Nexus Root Toolkit v2.1.1
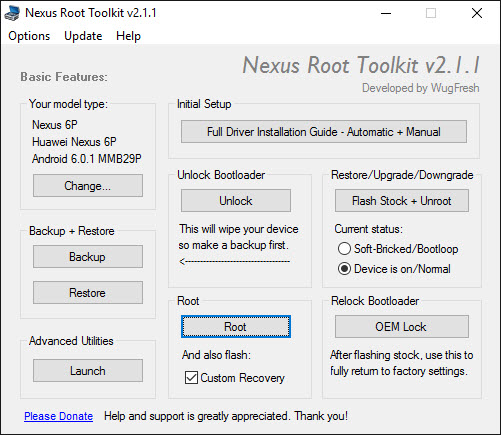
- Select the correct device and build (what you are currently running)
- Configure your drivers if you haven’t already using the driver guide (If you aren’t sure use Step 3 of the driver guide to test your drivers).
- If you need to, backup your important data.
- Unlock your device
- Root your device
- Enjoy!
- Learn more about each option by mousing over the control, dynamic tooltips will provide you more information, also each button displays a message about what it does first.
- So the best way to get familiar with the toolkit is simply to press the buttons and read what it says.
Step 1: Installing MultiROM :
Install MultiROM manager from Google Playstore

1) After installing, Open it.
2) Tick all the Check-boxes
3) In the last one choose the correct Kernel (Kitkat or Lollipop)
(WARNING: Check the Kernel Status: It should be in Green Letters, but if inRED then, ask about it in the comments section)
4) Tap Install
5) This will do everything for you, sit back and relax, it will take time.
6) After everything goes right, you should have:
- A modified custom recovery,
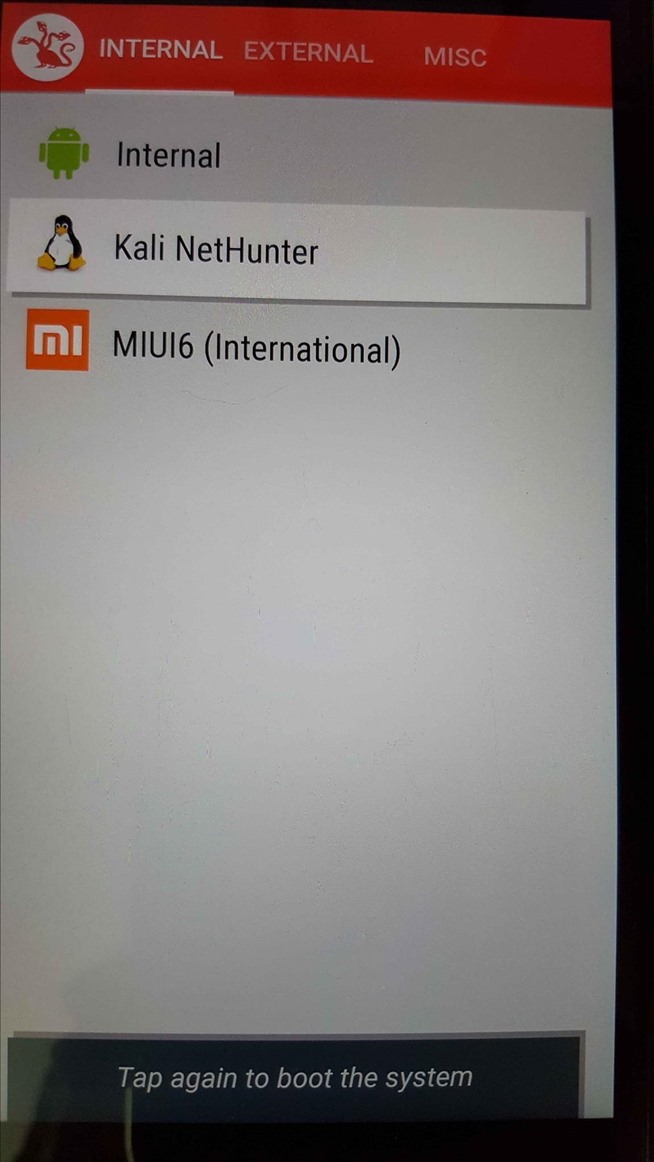
- A boot manager at start-up that asks, which ROM to boot into. (Press cancel so it won’t automatically boot into the Internal ROM)

- The same application, in the internal ROM, which manages every ROM, and Check for Updates.

Step 2: Downloading CM11-M11 ROM:
We will be using this because it is highly compatible with MultiROM.

Goto this website, and Download CM11 M11 ROM for OnePlus.
Click here for WiFi Model Nexus 2013
Click here for 4G/LTE Model Nexus 2013
Click here for LG Nexus 5
Click here for Nexus 4
Go to your default search engine (Google) and search this ROM for your Device if not listed here.
Step 3: Downloading Kali NetHunter
Go to the Official website of Kali
Scroll down to the bottom and download the correct image (actually .zip) for your Device.
Don’t use the Windows Installer.

Step 4: Downloading SuperSU.Zip and BusyBox:
Download this Super User update.
Also, Download BusyBox from Playstore or from here
Step 5: FLASHING CM11-M11 as a Secondary ROM:
After all of your Weapons are ready, it’s time to FIRE. (I mean Flash)
Move all the items to the root of your SD-card in your Device (or any other Folder)
- Reboot your system to Custom Recovery. (Vol-Down + Power, when device is turned off)

- Once booted, go to Advanced, then MultiROM settings, tap on add ROM


- Tap on Next. (Or choose where do you want to install the ROM Eg: A Flash/Pen Drive)

- Choose ZIP file

- Choose cm-11-20141008-SNAPSHOT-M11-xxxx.zip (The ROM you just Downloaded)

- Swipe to Confirm

- Once Finished, Reboot system.
————————————————Flashed——————————————–
- Use the MultiROM manager at Start-up to boot into The Flashed ROM.


- Go out there and explore!
- Install BusyBox, open it and then Install it. (It may/will fail because the system is not rooted) (Don’t worry its temporary, you may even skip this step)

- Once you are happy, and want to move on, Follow the next step.
Step 6: FLASH KALI NET-HUNTER!!!
- Reboot to Recovery.
- Go to MultiROM settings.
- Tap on ‘List ROMs’
- Choose the CM11-M11 ROM
- Tap the small button stating ‘Flash ZIP’

- Choose The Kali Nethunter.zip you just downloaded.

- Swipe to Confirm Flash
- After flashing, Reboot system.
—————————————–FLASHED————————————————-
- Congratulations you Successfully Flashed Kali NetHunter!!
- Boot into the ROM
- EXPLORE! Go Go Go!
- Sort things out, install necessary apps, play-store, Google services etc..
- Tap on KaliNetHunter Home (App) and Explore it too!


- However any service provided by it won’t WORK, because the ROM is not Rooted.
- Then what are we waiting for? Let’s gain the root access.
Step 7: Rooting the ROM:
It’s too easy! (Now that you have practice)
- Reboot to Custom/TWRP Recovery.
- Go to MultiROM settings.
- Then to ‘List ROM’.
- Choose the same ROM
- Then to ‘Flash ZIP’.
- Choose The SuperSU.zip that you downloaded.
- Swipe to Confirm Flash.
- After the Flash Reboot System.
——————————————–FLASHED/ROOTED——————————–
The FUN Begins:
And now rename the ROM if you want to, using the manager in Internal ROM.
Boot into NetHunter.
So you are good to Go!
Every service offered by NetHunter can be accessed!
Also download SuperSU.apk from the playstore and Install BusyBox again.
ENJOY! EXPLOIT! HAVE FUN!


that’s all folks ![😉]()

The post How to install Kali Linux NetHunter on your Nexus device appeared first on Tools4hackers.